| (8 intermediate revisions by the same user not shown) | |||
| Line 1: | Line 1: | ||
== iSCSI Initiator Settings == | == iSCSI Initiator Settings == | ||
| + | |||
| + | If you're getting IO latency in ESXi and you're connected to an iSCSI storage device then these settings may help solve your IO problems. | ||
| + | [[File:ESXi_iSCSI_IO_Timeouts.png|450px]]<br> | ||
=== Network Configuration === | === Network Configuration === | ||
| Line 15: | Line 18: | ||
=== Dynamic Discovery === | === Dynamic Discovery === | ||
| − | DON'T USE IT! | + | DON'T USE IT!<br> |
| + | Dynamic Discovery can seriously increase ESXi's boot time because it has to rediscover each of the dynamic iSCSI connections, and if iSCSI isn't available, then you have to wait for each dynamic iSCSI link to timeout.<br> | ||
| + | |||
At most use it to discover the IQN of your target then remove it.<br> | At most use it to discover the IQN of your target then remove it.<br> | ||
Once you have the IQN create Static Discoveries.<br> | Once you have the IQN create Static Discoveries.<br> | ||
| − | |||
| − | |||
=== Managing Paths === | === Managing Paths === | ||
| Line 28: | Line 31: | ||
[[File:ISCSI-RoundRobin.png|450px]]<br> | [[File:ISCSI-RoundRobin.png|450px]]<br> | ||
| + | ==== Taking Advantage of Round Robin ==== | ||
| + | By default ESXi is set to send 1000 IO's through each path before utilizing another path.<br> | ||
| + | If you want a performance boost from Round Robin you can lower the default value.<br> | ||
| + | I haven't found a way to do this from within the vSphere client so you will have to dive into the CLI.<br> | ||
| + | SSH into your VHost and run the following commands: | ||
| + | |||
| + | Get a device list: | ||
| + | esxcli storage nmp device list | ||
| + | Your device may look something like this: | ||
| + | t10.Nexenta_iSCSI_Disk______0024977cf719012_________________ | ||
| + | |||
| + | Change the default setting for your chosen device: | ||
| + | esxcli storage nmp psp roundrobin deviceconfig set --cfgfile --type=iops --iops=1 --device=[DEVICENAME] | ||
| + | Where [DEVICENAME] is the name if the device you got in the previous command '' "t10.Nexenta_iSCSI_Disk______0024977cf719012_________________" ''<br> | ||
| + | --iops=1 is the number of IO's you want to send down each path before switching to the next path. (I recommend between 1 and 10)<br> | ||
=== Disable Delayed Acknowledgement === | === Disable Delayed Acknowledgement === | ||
| − | Go to the General tab | + | Go to the iSCSI Software Adapter properties.<br> |
| + | On the General tab, click "Advanced".<br> | ||
Scroll to the bottom and uncheck "DelayedACK" | Scroll to the bottom and uncheck "DelayedACK" | ||
| − | |||
| − | |||
== Advanced Settings == | == Advanced Settings == | ||
| − | 1. Go to the Configuration tab, then click "Advanced Settings"<br> | + | 1. Go to the Configuration tab, then under Software click "Advanced Settings"<br> |
2. Click "Disk" then set the following options (scroll to the bottom).<br> | 2. Click "Disk" then set the following options (scroll to the bottom).<br> | ||
| Line 43: | Line 60: | ||
Disk.UseLunReset = 1 | Disk.UseLunReset = 1 | ||
| − | 3. Disable | + | 3. Disable VAAI (Hardware Accelerated Locking) by clicking "VMFS3" and setting the following options.<br> |
DataMover.HardwareAcceleratedInit = 0 | DataMover.HardwareAcceleratedInit = 0 | ||
| Line 52: | Line 69: | ||
VMFS3.EnableBlockDelete = 0 | VMFS3.EnableBlockDelete = 0 | ||
| + | |||
| + | From the CLI | ||
| + | esxcli system settings advanced set --int-value 0 --option /VMFS3/EnableBlockDelete | ||
''Note: This may already be disabled on ESXi 5.0u1 and later'' | ''Note: This may already be disabled on ESXi 5.0u1 and later'' | ||
| + | |||
| + | |||
| + | == References == | ||
| + | http://vmwaredepot.blogspot.com/2012/06/disabling-vaai-in-vmware-vsphere.html | ||
| + | http://blogs.vmware.com/vsphere/2012/04/vaai-thin-provisioning-block-reclaimunmap-in-action.html | ||
[[Category:ESXi]] | [[Category:ESXi]] | ||
Latest revision as of 10:11, 8 November 2014
Contents
iSCSI Initiator Settings
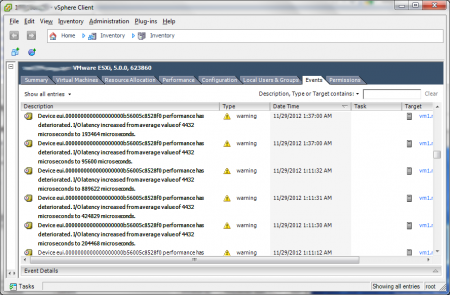
If you're getting IO latency in ESXi and you're connected to an iSCSI storage device then these settings may help solve your IO problems.
Network Configuration
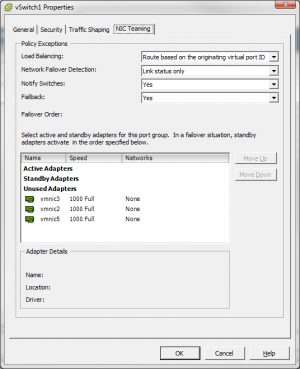
1. Create a single vSwitch with the NICs you want to use for iSCSI and set them as "Unused Adapters" in the NIC Teaming tab.
2. Create a "vmkernel" for each NIC and override the Teaming Settings, moving only a single NIC to "Active Adapters for each ".
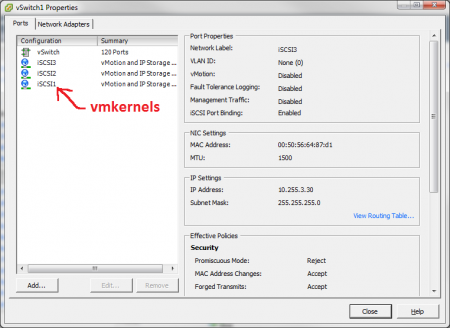
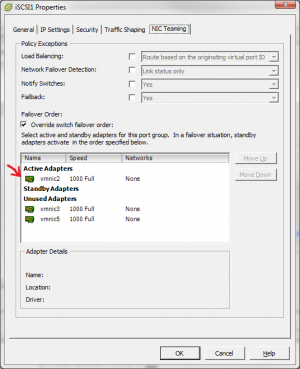
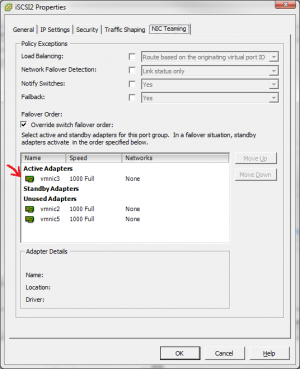
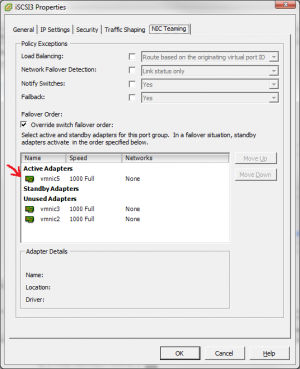
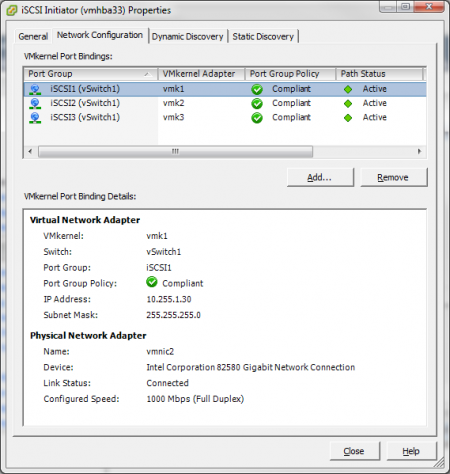
3. Now that we have a properly configured vSwitch, we can bind the vmkernels to the iSCSI Initiator.
Dynamic Discovery
DON'T USE IT!
Dynamic Discovery can seriously increase ESXi's boot time because it has to rediscover each of the dynamic iSCSI connections, and if iSCSI isn't available, then you have to wait for each dynamic iSCSI link to timeout.
At most use it to discover the IQN of your target then remove it.
Once you have the IQN create Static Discoveries.
Managing Paths
1. Right Click your device and select "Manage Paths".
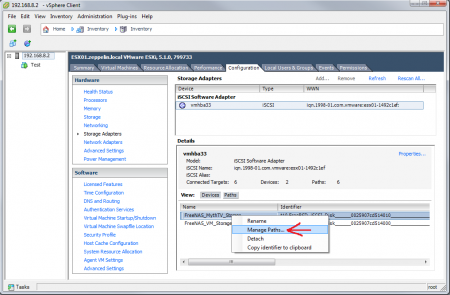
2. Configure Round Robin (Don't forget to click CHANGE).
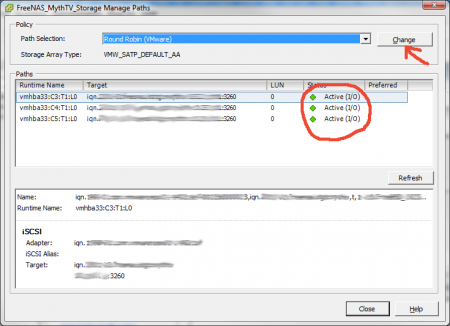
Taking Advantage of Round Robin
By default ESXi is set to send 1000 IO's through each path before utilizing another path.
If you want a performance boost from Round Robin you can lower the default value.
I haven't found a way to do this from within the vSphere client so you will have to dive into the CLI.
SSH into your VHost and run the following commands:
Get a device list:
esxcli storage nmp device list
Your device may look something like this:
t10.Nexenta_iSCSI_Disk______0024977cf719012_________________
Change the default setting for your chosen device:
esxcli storage nmp psp roundrobin deviceconfig set --cfgfile --type=iops --iops=1 --device=[DEVICENAME]
Where [DEVICENAME] is the name if the device you got in the previous command "t10.Nexenta_iSCSI_Disk______0024977cf719012_________________"
--iops=1 is the number of IO's you want to send down each path before switching to the next path. (I recommend between 1 and 10)
Disable Delayed Acknowledgement
Go to the iSCSI Software Adapter properties.
On the General tab, click "Advanced".
Scroll to the bottom and uncheck "DelayedACK"
Advanced Settings
1. Go to the Configuration tab, then under Software click "Advanced Settings"
2. Click "Disk" then set the following options (scroll to the bottom).
Disk.UseDeviceReset = 0
Disk.UseLunReset = 1
3. Disable VAAI (Hardware Accelerated Locking) by clicking "VMFS3" and setting the following options.
DataMover.HardwareAcceleratedInit = 0
DataMover.HardwareAcceleratedMove= 0
VMFS3.HardwareAcceleratedLocking = 0
4. Disable UNMAP.
VMFS3.EnableBlockDelete = 0
From the CLI
esxcli system settings advanced set --int-value 0 --option /VMFS3/EnableBlockDelete
Note: This may already be disabled on ESXi 5.0u1 and later
References
http://vmwaredepot.blogspot.com/2012/06/disabling-vaai-in-vmware-vsphere.html http://blogs.vmware.com/vsphere/2012/04/vaai-thin-provisioning-block-reclaimunmap-in-action.html